Showing posts with label quilt along. Show all posts

Tuesday, September 27, 2011

Diamond Chains Quilt Along: Binding and Catching up!

*Update included at the bottom of the post!

I had hoped to not need catch up time but it looks like I do. I am finishing up my charm pack quilt and have not even begun quilting my Diamond Chains. Probably shouldn't have told you that, but I figured I'd fess up. It WILL be finished this week though so I will post it as soon as it is done.

As I said before, I do not reinvent the wheel. There are a ton of tutorials out there for quilt binding. Here are just a few.
Jaybird Quilts: includes instructions for adding a flange. I don't want it for this quilt but it would be cool to include on another quilt later.
Heather Bailey: continuous binding tutorial
Crazy Mom Quilts: uses crossgrain binding/also sews her strips together with a 90 degree angle.
Quilter's Cache: good explanation of all types.
Little Red Hen: this is how I usually do my binding. Machine stitch anchor and hand stitch the back.
A Girl in Paradise: stitch in the ditch on the front to catch it in the back. Great tips on how to use pins to make sure you're catching the binding in the back.

(Picture borrowed from All Things Fee)
I saw a neat way to get the folds in your binding by setting up a pin on your ironing board with an opening the size you want your folded binding and running it through the pin. Iron it as it comes through the other side. All Things Fee gives a quick explanation of this here.

Here are a few variances in what different people do when they bind their quilts.
  1. Strip width can range from 1 7/8 to 3 inches. This is totally dependent on what you like. If you want a thicker binding to set things off, increase the size of your binding strips.this way.
  2. Strips can be attached at a 90 degree angle or a 45 degree angle. Some quilters avoid using a 90 degree angle because it is felt that it increases bulk, but I know a lot of quilters who do it.
Personally, I use 2.25" for my quilts. I also don't allow my children in the room when I am taking the corners and when I am combining the two ends when I finally get to the end of stitching it down the first time. It's not pretty. But after seeing some of the above tutorials, that's all going to be better this time, right?
Don't forget to put your updated quilt pictures or new quilts (if you are new to the quilt along) in the flickr pool. I will do the same! Our goal date for finishing is October 11 and the drawing for the prizes will be October 12th.

Update: Michelle from If Toys Could Talk mentioned a great technique I've seen in her comment below. When I questioned how you would attach the strips once you did the initial run around the front of the quilt, she came across this great video tutorial. Thanks Michelle!

Tuesday, September 13, 2011

Diamond Chains Quilt Along: Back, Baste, Quilt

Backing:
Like many quilters, I usually piece my backs. This is usually a combination of not wanting to have to buy more fabric, and having leftovers from the front of the quilt. I actually think that piecing a quilt back gives it character, and in some instances, gives you a chance to put in a little surprise "something" for a recipient. You might put in an extra block that you didn't use from the front, create a completely different block to feature on the back or you can go all out and create a 'front' for the back which would make it reversible. Other people use one fabric for the back of their quilt. I am actually doing a baby quilt this way just because it's easier. Either way you choose to do it, make it your own.

The back of Jen's quilt

There are some really good tutorials out there for piecing the back of a quilt. I've had to do a lot of online digging to find exactly what I wanted in some instances since I've kind of just learned by doing. For this reason, I wanted to put some of these things in one place.

Julie Herman of JayBird Quilts has a great basic tutorial for piecing a back on her site. Pink Chalk Studios teaches you an option for how to piece the same fabric together to cover your quilt front.
If you are really interested in digging into options for piecing a quilt back, there is a wonderful article here with multiple links to different bloggers' attempts to piece quilt backs. These bloggers include Pink Chalk Studio and Craft Nectar.
The back of X Marks the Spot

A recent post on quilt backs that provides a lot of great information is over at swimbikequilt.
One of the biggest things to remember when piecing the back of a quilt is this: the more intricate the back is, the more important it is that your front and back are square and aligned when basted so nothing comes out crooked in the end.

Since I now have my design wall, I used Julie Hermann's method of placing my quilt front on the wall. I then pinned fabric over the front until it was covered.

Then I took it down in pieces and sewed where needed.

Baste:
There is spray basting, pin basting and thread basting. I have done spray basting with limited results but I have heard that the 550 spray is the way to go. I chose whatever brand they had at Hobby Lobby. Yeah, well, you get what you pay for.
I usually opt to pin baste. Randi at ihavetosay has a great tutorial for pin basting on her site from her Road to Spring quilt along. Just make sure you have plenty of room and you have your quilt lined up with your backing.
Thread basting is done on your machine with a long basting stitch or by hand. I do not use thread basting but get the feeling that it is more beneficial for smaller projects or hand quilting.

Quilting:

straight-line quilting
There are tons of ideas out there for straight line stitching. You can outline the shapes like here, do cross-hatch designs as done here (you'll have to scan down to July 10, 2010), and Oh Fransson! has a variety of both straight line and free motion ideas here.

Tall Grass Prairie has some great ideas on straight line stitching here and even shows the use of painter's tape. I also love how Film in the Fridge did this gorgeous straight line stitching here. AnnaMarie at genXquilters just posted a straight line quilt that is similar to ours since it has a large solid piece to it.

Since I straight line quilt, I was leaning toward the way My Fiber Fix quilted her Summer Sampler here. Then I came across this fabulous quilting idea on Film in the Fridge. I tend to like quilting in a way that compliments the pattern while at the same time goes completely against the design of the quilt.
So I decided to try something to see how it would look. I got together some supplies.
I started doodling some of my own designs, copied the quilt design and then traced it onto parchment paper. This way when I get my final design, I can just move it over onto the main picture to insure that it's how I want it.

I wouldn't normally go to this much trouble determining my plan for quilting but there is a large amount of open space to be quilted on this piece and I wanted to make sure of my plan before I started.  And yes, I know the paper shows what I have planned for the blocks and not for the solid squares, but you'll just have to wait and see!


fmq
I have only JUST gotten my sewing machine to cooperate for free motion quilting (like two days ago) so I do not have any experience with this manner of quilting. However, I thought you might want some go to places for ideas so, here goes.
There is always the option to meander or stipple all over the quilt and ignore the pattern and open space. Another option would be similar to what I did and do straight line stitching over the blocks, then do fmq over your sollid areas. I even thought of one more option...
If you are a glutton for quilting, check out Leah Day's wonderful site, the free motion quilting project. She has a multitude of filler ideas and each has a video to give you instrucition. You could fill each section in large scale with one of her stitches, or you could set up your quilt in sections and quilt each differently. There are many ways this could be done.

hand quilting
Rebecca from Chasing Cottons did a series called Quilting 101 a while back. In it she did a whole section on hand quilting. So I'm going to leave this part to her, since I have yet to get it right!


However you decide to quilt your project, don't forget to post it in flickr so we can see how it looks! I'll post again on the quilt along on the 27th to give everyone time to finish up backs, quilt, etc. I will probably do a check-in next week on it!

Tuesday, September 6, 2011

Diamond Chains Quilt Along: Design Layout...Where does it all go?

So you've got all your blocks. Now we need to put them together with some big blocks of solid fabric. Well, here's where you get YET another choice! First, we're going to stop and think for a minute. We're not talking about quilting it yet, but we do need to think about that before we attach these solid pieces. What are your plans for quilting? We are going to have some fairly large strips of solid space, and one BIG solid space to quilt. Do you straight line quilt or free motion quilt? Do you want that solid space to be completely decorated with quilting or sparsely sewn?

There are two ways you can attach the solid pieces. The first method would be to cut 12 blocks from your solid fabric, each 12.5" square. These would be attached as you would any basic block quilt. You can sew the blocks together by row or by column. Press, and then sew each row or column together. Press.


If you are using straight line quilting, this method would provide some structure for you to follow because you would have some built in lines to help guide you. If you are a free motion quilter, it might help you visualize the quilt in sections as I know some free motion quilters do (i.e., Leah Day).  Something to think about.

The second option for attaching the solid pieces is to measure out the blocks needed to insert in each area and sew in each large piece. When sewing the pieces together, you can either choose to sew the pieces together by rows or by columns. I sewed mine by rows.

(The measurements given are approximate. These are based on IF your blocks came out 12.5" square.)

This will not give you lines to follow and may allow you a looser, more "go with the flow" manner in which to quilt. If you are straight line stitching, you may use tools like an Ink B Gone pen or painter's tape to provide your lines to guide you for your design. We'll get more into that when we discuss machine quilting.

Once you've decided how you're going to attach your solid fabric, it's time to get started putting your quilt together. As I said, I chose to sew mine together by rows so I will give you an idea of how that is done.


Since I took a pledge to post about my progress no matter what, I will say that I did make a pretty big boo-boo. I undoubtedly cut my biggest piece of fabric about 1/2" short and did not have a big enough piece to replace it with. It's close to the edge and I am planning on straight line stitching anyway since I haven't gotten the hang of FMQ yet so I am just going to use it as my first line on the right side. Here is my completed quilt top.
I've got to get some better lighting in my sewing room! Here is a close-up of the blocks.

Happy quilting! And don't forget to show your progress in the flickr group!

Tuesday, August 30, 2011

Diamond Chains Quilt Along: Block Method 2/Geese & Squares

Today's the day! It's block tutorial day! There are two tutes so if this is not the one you want to use, scan the rest of the post to find the other option for piecing. I don't know which tute will pop up first in the post so I am starting both with the same information.

The second method consists of the following and I will be providing a tutorial for this method:
  • four flying geese
  • four solid squares
  • one square with 4 corner set triangles
My original version of the block consisted of half-square triangles only, but this time I chose fabrics that I wanted to "show off" a bit more, so I chose a different variation of piecing that allowed me to have less cuts in the fabric. When preparing the flying geese, there does appear to be a little waste but I provide a little "Waste Not" activity for you to use these leftovers either for inclusion in your backing, or for a different project altogether. This weekend I also came across this tutorial on quilter's cache for a similar block with slight differences (our corner squares are solid and there are some slight differences in the fabrics present in some of the other pieces) if you would like to refer to their tutorial for more information.

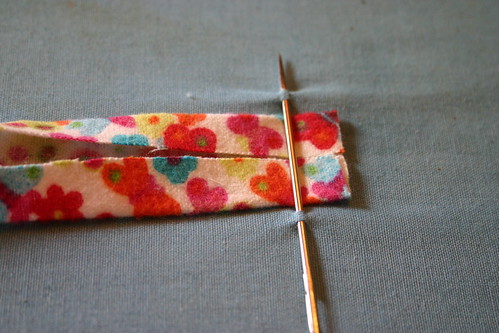
At one point during the tutorial I will refer to a 1/4" ruler. If you are unfamiliar with one of these, it is a great tool. Mine looks like a regular ruler with a raised side.

When that raised edge is placed downward flat and pushed up against a seam, it gives you a 1/4" from the seam so that you can trim away any excess fabric.

CUTTING FABRIC
If you are unfamiliar with cutting strips from a piece of fabric, please refer to a fabulous one Rachel has here at Stitched in Color. Follow steps 1-6. When you get to the point where you are cutting your squares (step 7), refer to this tutorial to see what size squares you will be cutting.

Fabric will be cut as follows (measurements are based on 44/45" width fabric; images are not depicted as perfect squares but are only used to indicate how fabric is to be cut). Be sure to trim off selvages before cutting your squares.:


Center fabric


6.5” squares

Cut 6.5” strips Selvage to selvage

Get 6 squares on first strip


Get 2 squares on second strip


Diamonds Fabric
Cut into eight 3.5" strips. The blue pieces are cut into 3.5" squares, 32 total. The pink pieces are cut into 6.5" x 3.5" strips, 32 total.


Chain Fabric:
Cut into two 3.5" strips. The squares are cut into 3.5" squares, 18 total.


Solid Fabric:
Cut into four 3.5" strips. All squares will be cut into 3.5" squares, 48 total. 32 squares will be kept whole. 16 will be used for HSTs.


Here we go!!
Center/ Corner Set Triangles

1. We are going to start with the center squares, and a pile of smaller corner squares (Diamond fabric).


2. Take each of the smaller Diamond fabric squares and turn them face down. Using a ruler, draw a line from point to point on the back of each square.
I moved my ruler over to the side so you could see my line.

3. Place your first square on the corner of your center square fabric. Line up the fabric and make sure your line matches the direction shown. Pin in place. If you choose to chain sew your pieces, go ahead and set up all 8 center pieces like this prior to sewing.


4. You are going to sew ON THE LINE using a 1/4" seam.  I did chain sewing so I ran each of my blocks through the machine one at a time without stopping. That way I had one corner of all my blocks done before starting to trim.

5. Separate your blocks and stack. Take each block and trim away the excess fabric. I use a 1/4" ruler. I hope you can see how I place the ruler with the raised side down (on the right), then slide it over so that the seam is on the left side of the 1/4" edge and the excess fabric is on the right side of the edge. Then I trim away the fabric left over on the right. I just made a stack of all my triangular trimmings. DON'T THROW AWAY YOUR TRIMMED FABRICS! I have a WASTE NOT activity for us later with these.

6. Press your fabric down. I press mine so that the fabric goes under the corner piece. I know the picture doesn't look exactly like that but it was a set up shot and I didn't notice I'd tucked the fabric the wrong way!


7. Go back to your work space and set up the next square in the next corner for each center piece. Chain sew all pieces. Trim.  Press. Keep repeating until you have sewn all four corners onto all 8 center pieces.


8. Your center pieces are done! You should now have a stack of center blocks that are 6.5" square...

and a pile of triangles trimmed from your fabric.

*****Here's our WASTE NOT activity!!!****** You don't have to do it right now, but I wanted to make sure I didn't forget it! You will have trimmed off triangles from your flying geese as well.
You can work these into a pieced back or use them later for another project.
We are going to chain sew HSTs out of our scrap triangles. This is not the same method of sewing HSTs as I mention in the alternate layout instructions for this block, but it utilizes our triangular scraps. Sew 1/4" seam down the right side of each set of triangles (each set should have one triangle of each fabric you just used).


Press them (as long as you press toward the same fabric every time, you're fine).

Sew two HSTs together so the points of the triangles meet as shown. Sew a second set as pictured. Press. The centers can get bulky so make sure you press each set in opposite directions.
Sew both sets together until, voila! Pinwheels!

I would wait until you've finished these and have a general idea of the size they need to be before trimming.

Now, on to the outside of the block!!!

Flying Geese and Corner Blocks
1. I know there are tons of great tutorials out there for making flying geese, and if you can figure out the math for making yours another way, that's great. But for now and for my sanity, we're going to make ours like this.
We are going to use the 6.5" x 3.5" strips from the Diamonds fabric, and the 3.5" squares of both the chain and solid fabrics.

2. Draw a line from point to point on the back of the 3.5" squares. Then line up a square on on side of a piece of the rectangular Diamond fabric. Pin. Sew ON THE LINE. This works a lot like attaching the corner set squares onto the center blocks.

Trim away the excess fabric with your 1/4" ruler, press and start over with a block on the left side.


You will need two with Diamond/Chain fabric and two with Diamond/Solid fabric for each of seven of the blocks. Your eighth block will have four Diamond/Chain flying geese as it will be the intersecting block in the design.

3. You will now need 4 of the Solid 3.5" squares. Put all your pieces in the correct placement.
Sew the first row together, the second row together, then the bottom row together. Press, alternating the direction of the seams (top row seams go toward the center, middle row away from the center, last row toward the center).
4. Sew all your rows together. Remember, you will have seven blocks with this set up. Don't forget your eighth block will have chain fabric going both directions (sorry if I keep repeating but I don't want you to have to take it apart and do it over!).
Here is how mine will connect. My intersecting block looks completely different because I mixed up the fabrics, but I think it will look cool anyway!
Don't forget to square up your blocks to 12.5". Also, please post your fabrics and blocks in our flickr pool so we can see how everyone is doing! If I made any mistakes or you have any questions, please let me know!