Okay, so I had to make a birthday present...fast! So I thought about doing something with a jelly roll but I couldn't find the right color scheme (purple; she's about to be 4). So I ended up with a two pack of fabrics in 1 yard increments that I picked up at Tuesday Morning, but I think this quilt would be a great little throw together quilt when you need something fast for a jelly roll. I had originally thought of doing the
jelly roll race quilt but decided I wanted to come up with something on my own. As I said yesterday, I'm eventually turning mine into a quillow
via this tutorial; I just have to go pick up some backing.
Some tips to remember:
1. You will be flipping the fabric upside down so try to avoid fabrics with directionality. You don't want half your designs to be upside down.
2. If you use a jelly roll, your quilt has the potential to be longer than mine. I only had about 28 strips which was great for a lap quilt size. If you choose to do the quillow, you might want to keep some of your remaining strips to make the actual pillow part in which the quilt will be stuffed.
3. This quilt was sewn with a 1/4 inch seam allowance.
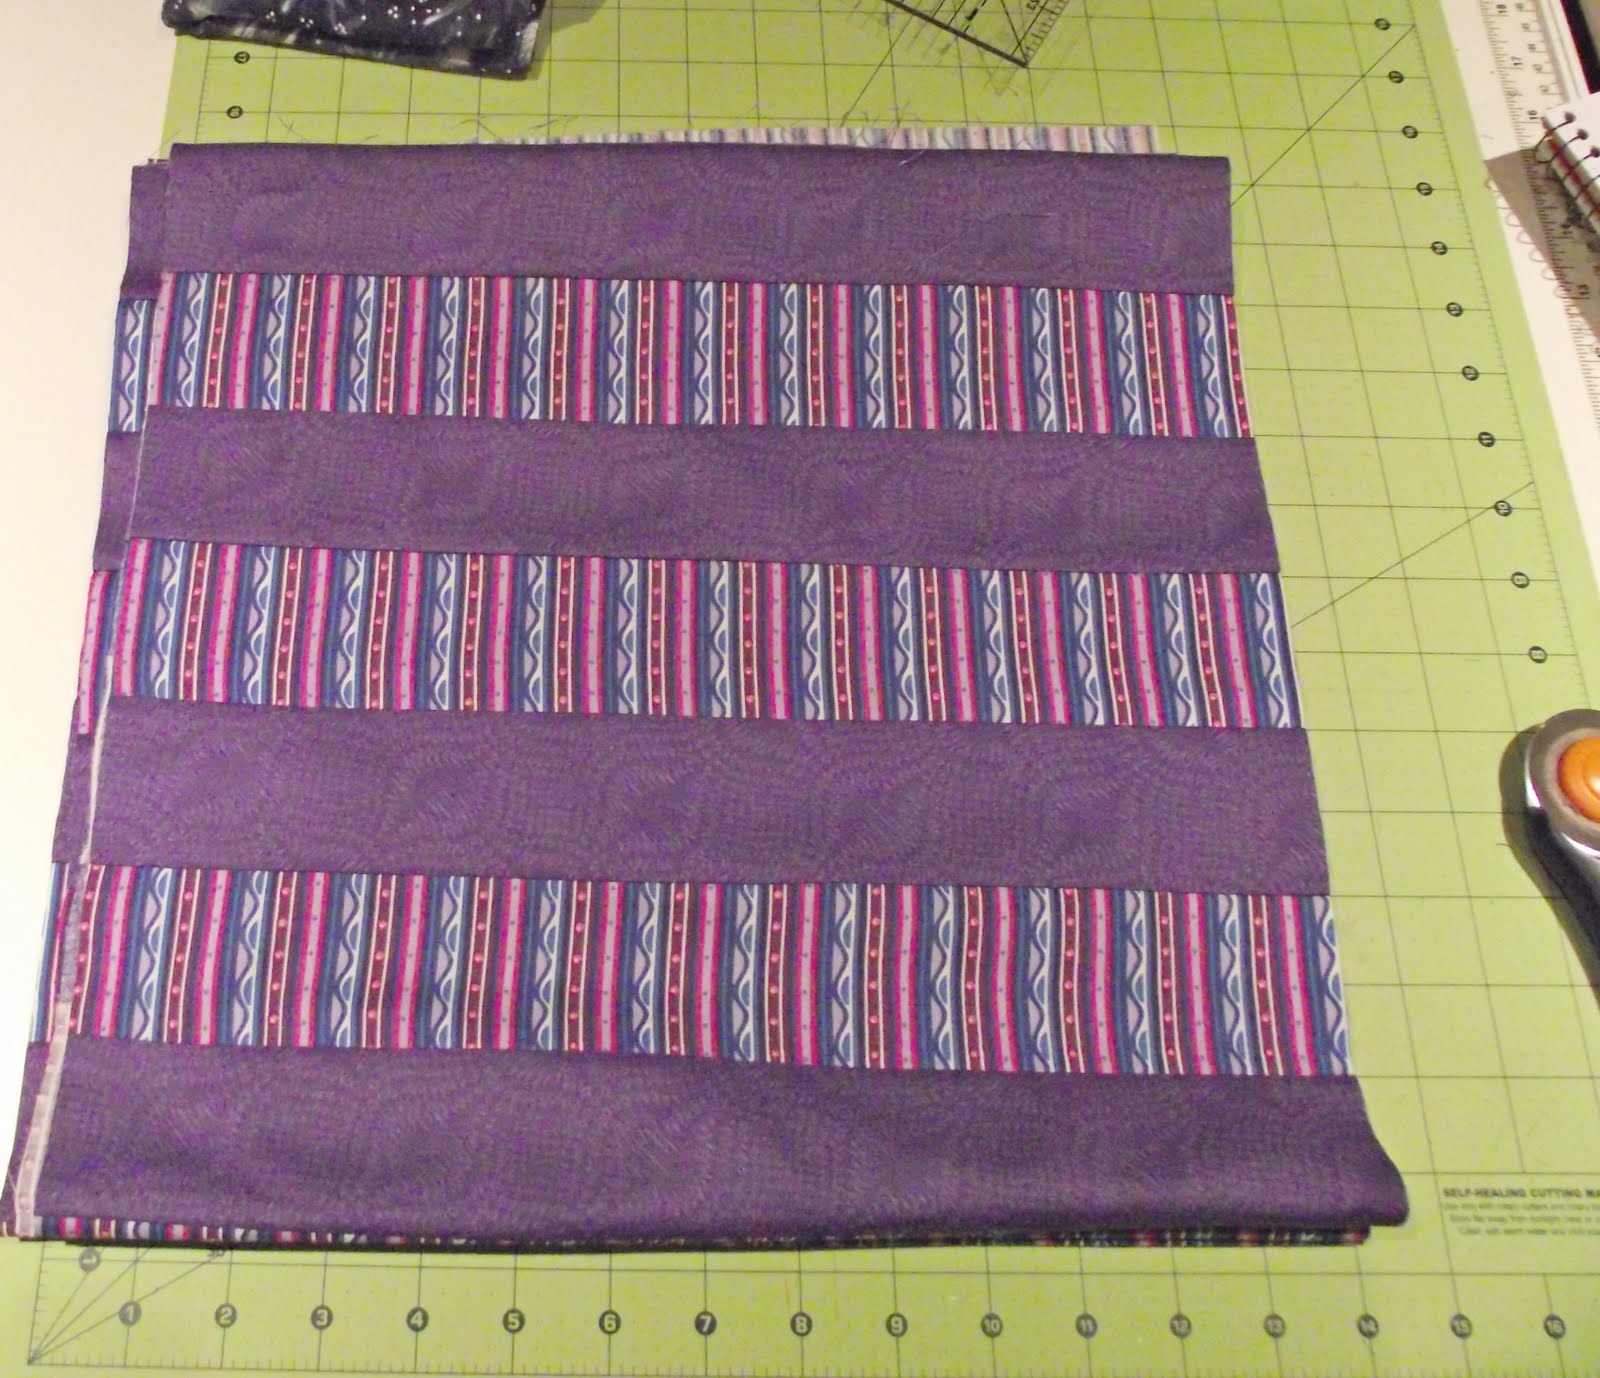
Here is what we will be making:
Keep in mind that the child I made this for is into purple!
Anyway, let's get crackin'!
1. If you are not using a jelly roll, you will need to cut your fabric into 2.5" strips, from selvage to selvage.
2. Place two different fabrics right side to right side and sew the length of the fabric (selvage to selvage). Pin if needed prior to sewing. You will alternate fabric until you have sewn several strips together. I sewed mine in groups of 7. If the 7th strip on a group was the stripe, I started the next group with the tone on tone.

I chose to sew my strips in groups of seven for a few reasons. I didn't want to sew any more than that in a group because I didn't want the sides to get too wonky (in a bad way) even though we are going to trim. Make sure you start on the same end when you are sewing each group; this will keep only one end of the fabric strips uneven. I also chose 7 because I was only working with two fabrics and this allowed me to have the same fabric on each end. One group would have the stripe on each end, one would have the tone on tone on each end. This would make it easier when it came time to sew all the groups together. The following picture shows all of this (left side is straighter while the right is more uneven; top has stripe on outside ends while bottom strip has purple on outside ends)
3. Sew the groups of strips together making sure to alternate fabrics so the pattern is uniform throughout. No, I haven't pressed anything yet! We're getting there!
4. NOW we're gonna do some seam pressing! Do not press your seams open . Press both to one side. Also, press every other seam to the opposite direction. This will help when we start cutting and re-sewing.
5. Your quilt will now look something like this.
You will now need to fold it in half using the seam edge between two strips as a guide, then once more. Time for trimming.
I was not really concerned with an exact measurement for my quilt so I just trimmed far enough to remove the uneven edges on the right and the selvage edges on the left.
6. Though not really concerned with the size, you will need to measure the width of the quilt at this point to figure out the next cuts. Mine was approximately 42.5 inches.
Here is where you get to play with it a bit. I needed my quilt to be in thirds because of the way it will be folded for the quillow. So I divided my 42.5 inches by 3 to come up with roughly three 14 inch sections. YOU can cut it in fourths or fifths, but I needed mine in thirds! If you do cut it into more, be careful keeping up with the directionality of the strips once you start sewing.
7. Since my quilt top was still folded from when I trimmed it, I left it and cut a straight line at 14 inches, and again at about 14 inches once I removed the first piece.
I now have three 14 inch wide strips.
8. Place the pieces out where you can see them and flip the center strip upside down. Your pattern will now alternate in both directions.
9. Place the first two strips right side to right side and pin. Use your alternating pressed seams to guide you in pinning.
Sorry, I know that's not the best picture. Anyway, sew these two pieces together. Then repeat by adding the third strip to the two thirds of the quilt you have already sewn together. Press the seams. I chose to press both seams together facing the outside of the quilt.
What are you left with?
Well, a quilt top that looks something like this!
I think this quilt would look great with more cuts and flips, more fabric colors, etc. From start to finish it was only a couple of hours. Now I just need to get it sewn into the quillow. How about you? I'd love to see any that you might come up with!


5 comments:
What a great quilt!! Now THAT'S one I could potentially try... we'll see. ;-) Love it!
Great idea! I'm often sewing with limited time and this looks like something that can be finished quickly. Thanks for sharing!
Looks great, fabulous idea! When I sew long strips like that together I start at the top and sew down for the first one, then when I add the 2nd strip I start at the bottom and sew up and then alternate from then on. That helps with the wonkiness of sewing the long straight lines.
I hope the recipients loves it! She's one lucky little 4 year old!
GREAT tute girl!! I will definately be trying this in the future!!
Who knew they have fabric at Tuesday Morning?! I love that your pictures on the blog are so clear and instructional. Great tutorial!
Post a Comment